
YAML front matter
YAML front matter란 Jekyll을 이용하여 github 블로그의 글을 작성할 경우 글의 맨 앞에 삽입되는 부분입니다. front matter가 시작되고 끝나는 부분은 3개의 대시(-)로 구분됩니다.
---
title: "First posting"
date: 2021-09-04 18:00:00
---
title
글의 제목을 표시합니다.
title: "YAML front matter 설명"
excerpt
글의 내용을 간략히 요약한 문장으로, 제목 밑에 요약문이 함께 표시됩니다.
excerpt: "본 글은 YAML front matter 작성을 위한 설정변수 및 설명을 간략히 요약하였습니다."
layout
layout에 지정된 값에 따라 자동으로 class가 정의되어 각 layout에 알맞는 화면을 보여줍니다. 일반적으로 많이 사용되는 layout은 다음과 같습니다.
single: 일반적인 글 작성의 경우categories: 지정된 카테고리별 목록을 보여주는 페이지를 작성할 경우tags: 지정된 태그별 목록을 보여주는 페이지를 작성할 경우posts: 년도별 목록을 보여주는 페이지를 작성할 경우search: 검색 페이지를 작성할 경우default:_config.yml에 사전 정의된 포맷을 사용할 경우
그 외에도 archive, archive-taxonomy, splash, home 등이 있습니다.
layout: single
table of contents
heading에 의해 자동으로 생성된 목차를 본문에 삽입합니다. heading은 누락된 것 없이 순차적으로 작성되어야 하며(#, ##, ###는 O, #, ###, #####는 X), 이에 해당되는 parameter는 다음과 같습니다.
| Parameter | Values | Description | Default |
|---|---|---|---|
| toc | true or false | 목차를 보여줄 것인지의 여부 | false |
| toc_label | 목차의 이름 | 목차의 이름 정의 | UI text data file에서 기본 정의된 이름 |
| toc_icon | true or false | 목차 아이콘 정의 | Font Awesome의 file-alt 아이콘 |
| toc_sticky | true or false | 화면 상단에 목차를 고정할지의 여부 | false |
toc: true
toc_label: "Table of contents"
toc_icon: "cog"
toc_sticky: true
show_date
글의 제목을 표시할 때 아래에 작성된 시간을 표시할지의 여부를 지정합니다. 기본값은 false입니다.
show_date: true
read_time
글의 제목을 표시할 때 아래에 읽는데 소요될 시간을 표시할지의 여부를 지정합니다. 표시되는 시간은 _config.yml의 words_per_minute 항목에 지정된 값을 기준으로 계산되며, 기본값은 true입니다.
read_time: true
categories
글의 카테고리를 지정하기 위한 부분으로, 이를 적용시 해당 글의 주소는 https://id.github.io/카테고리명/글제목이 됩니다.
categories:
  - normal
tags
작성된 글의 tag를 지정하는 부분으로, 여러개를 동시에 지정할 수 있습니다.
tags:
  - description
  - YAML front matter
header
포스트 혹은 페이지에 이미지 같은 시각적인 요소를 추가하기 위한 용도로 사용됩니다. header에 추가될 수 있는 옵션은 다음과 같습니다.
| Name | Description | Default |
|---|---|---|
| overlay_image | 글 상단의 header 부분에 삽입될 overlay image를 지정. 해당 image 위에 title 등의 정보를 함께 표시할 수 있음 | |
| overlay_filter | overlay image의 색상 혹은 투명도를 지정 | |
| overay_color | overlay image 대신 색상을 지정 | |
| image | 글 상단의 header 부분에 삽입될 image를 지정. 해당 image 위에 title 등의 정보를 함께 표시할 수 없음 | |
| caption | overlay image의 캡션을 지정 | |
| show_overlay_excerpt | overlay image(or color)에 excerpt를 표시할지의 여부 | true |
| excerpt | header에 excerpt를 추가할 경우 기존 작성된 excerpt를 덮어씀 | |
| actions | action button link를 호출 |
header:
  # overlay_color: "#333"
  overlay_image: /assets/img/header.jpg
  overlay_filter: 0.5  # opacity
  # overlay_filter: rgba(255, 0, 0, 0.5)  # color filter and opacity
  # overlay_filter: linear-gradient(rgba(255, 0, 0, 0.5), rgba(0, 255, 255, 0.5))  ## color filter, opacity and linear gradient
  caption: "Photo credit: [**Unsplash**](https://unsplash.com)"
  show_overlay_excerpt: true
  actions:
    label: "Download"
    url: "https://github.com"
기타
permalink
작성된 글에 고유 주소를 부여하고자 할 때 사용됩니다. 아래와 같이 permalink를 부여할 경우 해당 글은 id.github.io/yyyy-mm-dd-title'이 아닌 id.github.io/about'이라는 주소로 접근할 수 있습니다.
permalink: /about/
wide page
wide 형태의 페이지로 글을 게시하려면 포스트 또는 페이지의 YAML front matter에 아래의 내용을 추가합니다.
classes: wide
sidebar
sidebar(← 참조)를 추가할 경우 사용되며, sidebar 목록은 _data/navigation.yml에 아래와 같은 형식으로 작성합니다.
docs:
- title: "YAML front matter"
  children:
    - title: "title"
      url: /markdown/explain-YAML-front-matter/#title
    - title: "excerpt"
      url: /markdown/explain-YAML-front-matter/#excerpt
    - title: "layout"
      url: /markdown/explain-YAML-front-matter/#layout
    - title: "table of contents"
      url: /markdown/explain-YAML-front-matter/#table-of-contents
    - title: "show_date"
      url: /markdown/explain-YAML-front-matter/#show_date
    - title: "read_time"
      url: /markdown/explain-YAML-front-matter/#read_time
    - title: "categories"
      url: /markdown/explain-YAML-front-matter/#categories
    - title: "tags"
      url: /markdown/explain-YAML-front-matter/#tags
    - title: "header"
      url: /markdown/explain-YAML-front-matter/#header
    - title: "기타"
      url: /markdown/explain-YAML-front-matter/#기타
    - title: "적용 예"
      url: /markdown/explain-YAML-front-matter/#적용-예
sidebar를 개별 포스트 또는 페이지에 적용하려면 YAML front matter에 아래의 내용을 추가합니다.
sidebar:
  nav: "docs"
블로그 메인에 sidebar를 추가하려면, _config.yml의 default 부분에 아래의 내용을 추가하면 됩니다.
defaults:
  # _docs
  - scope:
      path: ""
      type: docs
    values:
      sidebar:
        nav: "docs"
custom head and footer
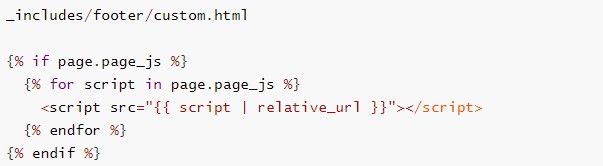
포스트 혹은 페이지의 head 및 footer에 custom CSS를 적용하고자 할 때 사용됩니다. 적용하기에 앞서 우선 _includes/head/custom.html 및 _includes/footer/custom.html를 아래와 같이 수정해야 합니다.
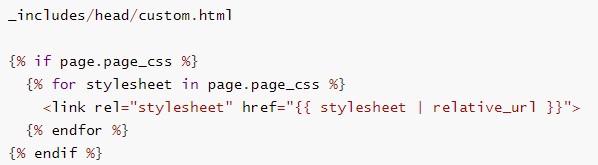
head 부분에 custom CSS를 적용하기 위해서 YAML front matter에 적용할 custom css의 정보를 아래와 같이 입력합니다.
page_css:
  - /path/to/your/custom.css
footer 부분에 custom CSS를 적용하기 위해서 YAML front matter에 적용할 custom css의 정보를 아래와 같이 입력합니다.
page_js:
  - /path/to/your/custom.css
적용 예
현재 글에 적용된 YAML front matter는 아래와 같습니다.
title: "YAML front matter 설명"
excerpt: "YAML front matter의 작성에 사용되는 설정변수의 의미 사용방법에 대해 설명합니다. 내용은 지속적으로 추가될 예정입니다."
show_date: true
read_time: true

toc: true
toc_sticky: true
toc_label: "Page Index"

header:
  show_overlay_excerpt: true
  overlay_filter: 0.5
  overlay_color: "#333"
  actions:
    - label: "More Info"
      url: "https://mmistakes.github.io/minimal-mistakes/docs/quick-start-guide/"

sidebar:
  nav: "docs"

categories:
- markdown
tags:
- markdown
- YAML front matter
- description
- jekyll
20210905 계속 추가 예정
Leave a comment